Create A Company
End Users can have one or more Companies - here's how to create and manage them.
Here, we'll describe how to connect the Autofy Agent to your user's QuickBooks Company file. Before you start this step, your end user should make sure that:
- QuickBooks is open to the desired Company file
- QuickBooks is in single user mode, logged in as the QuickBooks admin (not just a user with admin rights)
- No more than 1 company file is open
Call /manage/company
Request:
https://api.propelware.com/v1/manage/company
Payload:
companyNameis left empty in your request, and populated by Autofy.dateTimeCreatedis left empty in your request, and populated by Autofy based on when this request is processeddateTimeLastAccessis left empty in your request, and is the last time the QB company has been accessedfullPathis left empty in your request, and is the Windows file path location of the QB company fileidis left empty in your request, and is the Company's ID in the Autofy APIisActiveis left empty in your request, and denotes if this Company is active on the Autofy API, always set to true when returneduserIdis the userID returned to you from /manage/user POSTexternalIdis left empty in your request, and is used for internal support purposesendpointis a short code that identifies the application you wish to connect with. Set this to "qbd"endpointIdis left empty in your request, uniquely identifies your end user's QuickBooks Company file. Include this value in subsequent calls to /process or /select
{
	"companyName": "",
	"dateTimeCreated": "",
	"dateTimeLastAccess": "",
	"fullPath": "",
	"id": "",
	"isActive": true,
	"userId": "Your 'user.id'",
	"externalId": "",
	"endpoint": "qbd",
	"endpointId": ""
  "version":""
}
Example:
curl --request POST \
  --url https://api.propelware.com/v1/manage/company \
  --header 'cache-control: no-cache' \
  --header 'content-type: application/json' \
  --header 'authorization: {YOUR_API_KEY}' \
  --data '{  "companyName": "",  "dateTimeCreated": "",  "dateTimeLastAccess": "",  "fullPath": "",  "id": "",  "isActive": true,  "userId": "28bb12f7393944a7be956888900d1f05",  "externalId": "",  "endpoint": "qbd",  "endpointId": ""}'
Authorize the Agent
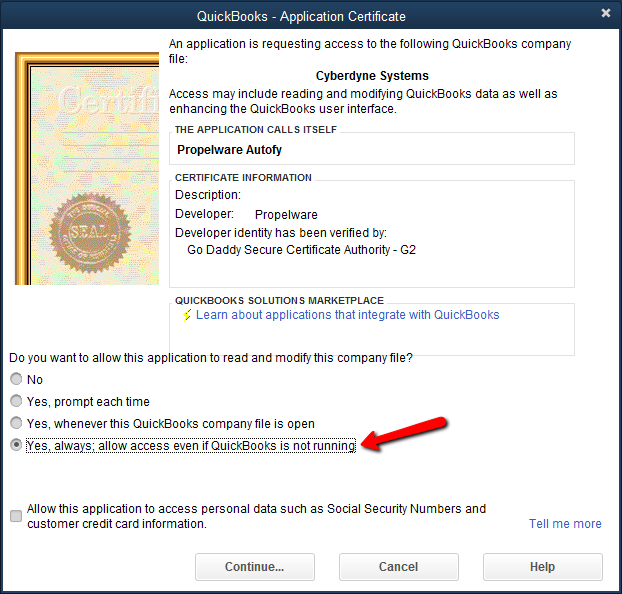
When you call /manage/company with POST, the Autofy platform calls down to the Agent and attempts to connect to QuickBooks. You'll need to authorize the Agent with the QuickBooks Company file you currently have open.
In QuickBooks, you'll see this modal asking for authorization for Autofy to access. Give Autofy access even if QuickBooks isn't running.

Upon successfully connecting to QuickBooks, you'll receive the following response:
{
	"Meta": {
		"StatusCode": 0,
		"Severity": null,
		"Message": null
	},
	"company": {
		"companyName": "Test",
		"dateTimeCreated": "2016-09-16T13:41:30.2156102-05:00",
		"dateTimeLastAccess": "2016-09-16T13:41:37.1445599-05:00",
		"fullPath": "D:\\Programs\\QuickBooks Enterprise 16\\Company Files\\Test.qbw",
		"id": "d1228a71de104b3494482d15f8b09f7c",
		"isActive": true,
		"userId": "28bb12f7393944a7be956888900d1f05",
		"externalId": "",
		"endpoint": "qbd",
		"endpointId": "c67e83e28abe40e59164fbe5888a178b"
	}
}
Updated over 5 years ago
What’s Next
