Connecting
Preparation
When your user goes to connect the Agent to their QuickBooks Desktop, they'll need to make sure of a few things. Be sure to communicate this to your users in your own guides, and feel free to use our content to help you.
Before connecting to their QuickBooks, your users should make sure:
- The branded Agent you gave them is installed and running on their desired machine
- They have entered their
agentTokenand clicked Save - The Agent shows as Connected in dark blue text.
- QuickBooks is open to the desired Company file
- QuickBooks is in single user mode, logged in as the QuickBooks admin (not just a user with admin rights)
- No more than 1 company file is open
These precautions are only necessary on initial connection to a company file. Once they have connected successfully, they can return to normal use (i.e. multi-user mode).
Connecting
You should give your users a way to initiate the connection to their QuickBooks - often this is a dedicated Connect button, or perhaps when they click Next on particular page in a wizard. This is when you should call Autofy to connect.
When you call /manage/company with POST, the Autofy platform immediately calls down to the Agent and attempts to connect to QuickBooks. The end user will need to authorize the Agent with the QuickBooks Company file they currently have open.
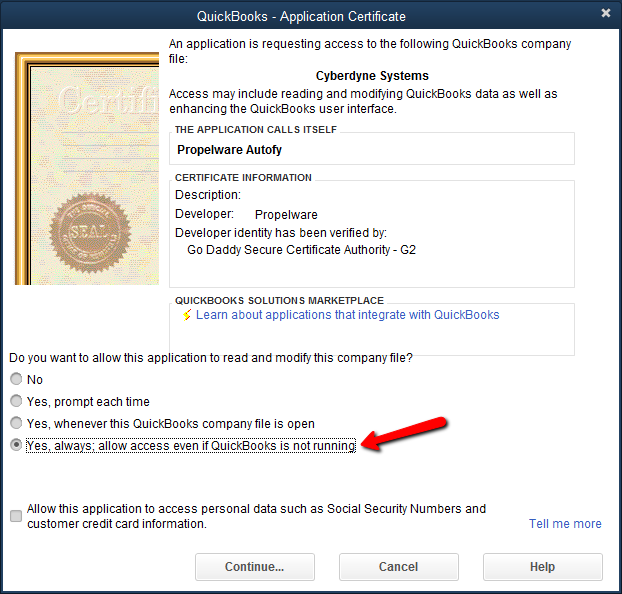
In QuickBooks, your end user will see a modal asking to authorize Autofy. They should give it access even if QuickBooks isn't running. This gives you the greatest possible availability to work with their data.

Once successful, you'll see a JSON response giving you the endpointID for that company. Store this value on your end to make calls for that company.
{
    "Self": "https://api.getautofy.com/v2/Manage/company",
    "Kind": "collection",
    "RequestId": "775A6EA3846F4DC2943B44AF7A0C2342",
    "Page": 1,
    "MoreData": null,
    "HasErrors": false,
    "Contents": [
        {
            "Object": {
                "companyName": "Larry's Landscaping & Garden Supply",
                "fullPath": "C:\\Users\\user\\Documents\\QB\\sample_service-based business.qbw",
                "version": "Intuit QuickBooks Enterprise Solutions 22.0 - US",
                "dateTimeCreated": "2023-06-14T21:26:14.8074525Z",
                "dateTimeLastAccess": "2023-06-14T21:26:14.8074525Z",
                "endpoint": "qbd",
                "endpointId": "xxxxx",
                "id": "xxxxx",
                "isActive": true,
                "userId": "xxxxx",
                "token": "",
                "externalId": "",
                "appName": "",
                "isRightNetworks": false
            },
            "Errors": null,
            "Self": "https://api.getautofy.com/v2/Manage/company",
            "Kind": "company"
        }
    ],
    "Errors": []
}
Connection Overview
- Agent is installed on user's machine
- User token is entered on Agent
- Agent shows as Connected
- Make IsActive call to Agent to confirm connection
- User is logged into QuickBooks as QuickBooks Administrator (QB Admin) and in Single User Mode
- Make provisioning call
- User accepts permissions certificate in QuickBooks
- JSON response is returned with endpointId. Store this value.
- User may go back to Multi User Mode and use QB normally after the company file has been provisioned.
Updated over 2 years ago
